.png?width=100&height=100&name=Untitled%20design%20(8).png)
This chapter explains how to model target SharePoint and deploy the source content. This chapter contains the following topics:
- Modeling SharePoint Target
- Deploying Source Data for Migration
- Committing the Migration
Modeling SharePoint Targets
Tzunami Deployer enables you to model your target SharePoint, into which the source content will eventually be migrated. You can model:
- Structure – Create or modify site collections, sites, portal areas (SPS2003 only), libraries, lists and folders. For more information, see Modeling SharePoint Structureon page 4-35.
- Metadata – Design the property sets and properties that comprise the columns of the target SharePoint lists. For more information, see Modeling SharePoint Metadata Service on page 4-41.
- Security and Permissions – Create or modify groups and permissions levels, add users and assign permissions. For more information, see Viewing Security Information on page 4-47.
If you are satisfied with your existing target SharePoint structure and do not wish to make any modifications to it, you can skip this section and proceed to the deploying step. For more information about deploying, see Deploying Source Data for Migration on page 4-59.
After loading a target SharePoint, you can model your target SharePoint.
|
Modeling a SharePoint target does not actually modify your server. All changes are made in your Tzunami Deployer project and are only applied to the target SharePoint when you commit them. For more information about committing, see Committing the Migration on page 4-84. |
Modeling SharePoint Structure
Tzunami Deployer enables you to use its simple and intuitive interface to create, delete, or modify items in the target SharePoint structure. SharePoint 2007/2010/2013 or Office 365 supports creating folders under lists. SharePoint 2003 only supports creating folders under libraries. Tzunami Deployer also enables you to edit the properties of existing SharePoint items. For more information, see Editing Properties of SharePoint Item on page 4-38. You can right-click the following items and select an action from the context sensitive menu:
- Sites
- Portal Areas
- Lists
- Folders
- Items
|
You can also rename an item by selecting it and pressing F2. SharePoint imposes some character and length limitations on item names. For more information, seeFolder and File Naming Considerations on page I or refer to your SharePoint documentation. Tzunami Deployer may rename folders or documents by replacing invalid characters with an underscore (_). These procedures are similar to the procedures used in the native SharePoint environment. Any SharePoint item can be deleted, except for virtual servers and some built-in lists. |
The icons of newly created items in Tzunami Deployer are displayed with a star (![]() ) overlay. Similarly, the icons of modified items in Tzunami Deployer are displayed with a pencil (
) overlay. Similarly, the icons of modified items in Tzunami Deployer are displayed with a pencil (![]() ) overlay. The overlays signify that the particular item exists or is modified in the Tzunami Deployer project only, and not in SharePoint.For example:
) overlay. The overlays signify that the particular item exists or is modified in the Tzunami Deployer project only, and not in SharePoint.For example:
![]() – Existing unmodified document library.
– Existing unmodified document library.
![]() – Existing modified document library.
– Existing modified document library.
![]() – New document library.
– New document library.
The overlays are removed after the changes are committed.
Creating a New Site
Tzunami Deployer allows you to create new sites on the target SharePoint Structure. New site can be added as a site collection, if created under the virtual server or a web application, or as a sub-site, if created under another site, from the templates (like Blogs, My Sites, Team Sites, Meeting Workspaces etc.) and according to the location you selected in the target SharePoint.
To create a SharePoint site in Tzunami Deployer:
1. Right-click the location in the target SharePoint in which to create the new site and select New > Site. The New WSS Site window appears.
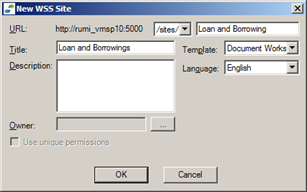
Figure 24: New WSS Site Window
|
When you create a site collection, the Owner field is enabled (since only site collections have owners) and the Use unique permissions checkbox is disabled (since site collections always have unique permissions – they cannot inherit permissions from their parent, for they do not have a parent). When you create a sub-site, the opposite is true. |
2. Enter information describing the URL. A SharePoint site URL is comprised of the following:
- Server address – The server URL, such as http://moss.tzunami.net. This value can also be an IP address.
- Managed path – Typically sites/ or personal/. Additional managed paths can be configured in SharePoint.
- Hierarchy of site group and parent sites – Relevant for sub-sites only.
- Site name – For a site collection, enter a site name and select the managed path from the drop-down list. For any other site, enter the site name.
3. Enter a Title and Description to be used for the new SharePoint site.
4. Select the Site Template to be used. When you select a template, a short description is displayed below it.
|
For a site collection, enter the owner account. For sub-sites, select whether the site should use unique permissions. If you do not select Use unique permissions, the site inherits the permissions of its parent site. |
5. Click OK.
The new SharePoint site is added to the target SharePoint tree. The configuration of the new site is determined by the SharePoint site template you selected.

Figure 25: Tzunami Deployer Project Window – Target SharePoint Site
Creating a New List in a SharePoint Site
Tzunami Deployer allows you to create new lists on the target SharePoint Structure. New list can be created in a site or portal area from the templates in the target SharePoint.
To create a new list in a SharePoint site:
1. Right-click a site or portal area and select New > List. The New SharePoint List window appears.

Figure 26: New WSS List Window
2. From the Template drop-down list, select the list template you want to use (For e.g. Document Library).
3. Enter a name and description for the new library and click OK.
The new library is created.
|
You can select Display list on the Quick Launch for quick launch display. You can also select Specify relative URL, and specify the URL of the list. This is not a SharePoint option. |
Editing Properties of SharePoint Item
Different types of items have different properties and settings that can be edited, as follows:
- Sites that are created in Tzunami Deployer and have not yet been committed to the target SharePoint can be edited using the Edit Site option. Properties of all sites can be viewed using the Properties window. The URL, language, and template of the site cannot be edited.
- Lists, folders, files, and list items can be edited using the Properties window.
|
The Properties window can remain open while you work in the Project window. It reflects the properties of the currently selected item. Several items can be simultaneously edited using the Properties window. For more information about the Properties window, see Viewing Item Properties on page 4-56. |
You can edit the properties of new sites till they are committed to the target SharePoint. However, you cannot edit the properties of sites that already exist in SharePoint. Such existing sites can only be viewed in the Properties window.
To edit properties of a new site:
- Right-click a new site in the target SharePoint tree and select Edit Site. The New WSS Site window appears (Figure 24) with the non-editable fields disabled.
- Modify all the enabled properties and click OK. The site’s properties are edited.
Find and Replace File Names
The Find and Replace window is used to make naming corrections to files and folders within Document Libraries.
To correct file and folder names within Document Libraries:
1. Right-click a Document Library in the target SharePoint tree and select Find & Replace. The Find and Replace window is displayed.
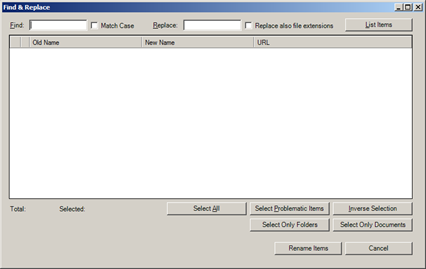
Figure 27: Find and Replace Window
2. Type the text you want to find in the Find field.
3. Select the Match Case checkbox for case-sensitive searches.
4. Type the replacing text in the Replace field.
5. Optionally, select the Replace also file extension checkbox to enable Tzunami Deployer to modify file extensions.
6. Click List Items.
A list of files and folders containing the text you entered in the Find field, along with their expected name, and their URL (for reference purposes) appears.
7. Select the files or folders you want to change by selecting their corresponding checkboxes.
Or Click Select All.
Or Click Inverse Selection.
Or Click Select Problematic Items to select items that contain text prohibited by SharePoint in their names (see Checking Deployed Itemson page 4-79).
8. Click Rename Items.
The names are corrected.
|
You can leave the Replace field empty in order to remove the searched value from all names. The Select Problematic Items is very useful if you have just deployed content but have yet to commit it, and would like to prevent illegal naming, blocked extensions and long URLs in SharePoint. For example, replacing “Business Intelligence” with “BI” is a good solution for handling long URLs. |
Modeling SharePoint Metadata Service
Documents and data items are associated with metadata properties (also referred to as fields or attributes) such as creation date, author, title, keywords, status, and so on.
In SharePoint, the metadata is managed via lists and libraries. Each list or library has its own property set – the collection of properties that is specific to the container.
The Metadata Editor provides you with a centralized authoring environment in which to define the columns of all lists and libraries in the entire target store. Using the Metadata Editor you can create new property sets, duplicate property sets, create new properties, and copy them from one property set to another.
To view the Metadata Editor:
1. Select View > Metadata Editor.
Or Click ![]()
Or Press F9.
The Metadata Editor window appears. The top half of the window displays the property sets of the selected source system. The bottom half displays the property sets of the target SharePoint store.
The Metadata Editor window displays the property sets on the left and the properties of the currently selected property set on the right.
|
While the cursor hovers over a property set, a hint appears displaying the number of containers that are using the property set.

Figure 28: Metadata Editor Window
2. If you right-click a property set in the left half of the screen and select Show usage, the File Property set window appears, displaying the containers that use the selected property set.
Figure 29: File Property Set Window 3. Select an item and click Go To. Tzunami Deployer displays the selected item in the Project window. Creating Property SetsNew property sets can be created to define the target SharePoint metadata. To create a property set:
You can define new properties for this property set. For more information, see Creating and Editing Properties on page 4-43.
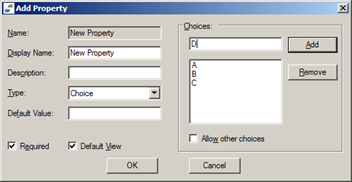
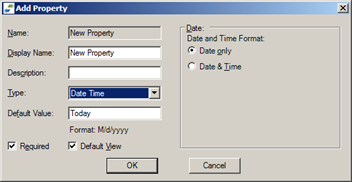
Creating and Editing PropertiesYou can create a new property or edit the existing properties for the property set. To create a property: 1. In the Metadata Editor window (Figure 28), right-click a property set. 2. Select New > Property. The Add Property window appears.
Figure 30: Add Property Window 3. Fill in the fields according to the information in the following table and click OK. The property is added as a new column in the list using this property set. Table 7: Add Property Window Fields
To edit a property:
Figure 31: Edit Property Window Assigning Property SetsProperty sets have underlying types that must match the list to which you assign them, so that a document library property set can only be assigned to a document library and not to a different library (For e.g. an image library) or to a different type of list. A property set cannot be used on more than one list or library. This section is relevant to property sets that are not in use (new or duplicated).
To assign a property set to a list: 1. Drag and drop a property set from the Metadata Editor onto a library or list in the Project window. Or Right-click the property set and select ‘Assign To...’. The Target Items window appears.
Figure 32: Target Item Window 2. Select a target list to which to assign this property set and click OK. A confirmation window appears indicating which property set will be assigned to which list. 3. Click Yes. The Assign Property Set window appears, displaying property mapping information.
Figure 33: Assign Property Set Window – Property Mapping
4. Select a source property (top left) and a corresponding target property set (top right) and click Map. Repeat this step for each property you want to map. For more information about mapping properties, see Mapping Properties on page 4-67. 5. Click Next. The Assign Property Set window displays value mapping information based on the property mapping performed in the previous set.
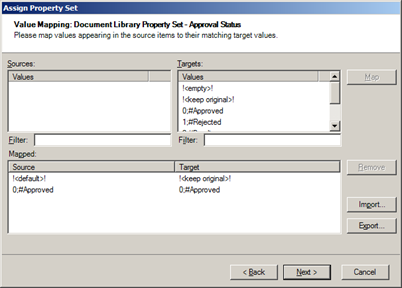
Figure 34: Assign Property Set Window – Value Mapping 6. Select a source property value (top left) and a corresponding target value (top right) and click Map. Repeat this step for each property value you want to map. For more information about mapping property values, see Mapping Property Values on page 4-72. Check Add all unmapped values as legal target property valuesfor adding unmapped value to target. Similarly Check Remove unmapped target values for removing the unmapped target values. 7. Click Next. The property set is assigned. Since modifying the property set modifies the columns of the target list and pencil overlay appears on the target location icon (for example
Viewing Security InformationSecurity information is part of the content loaded into Tzunami Deployer projects. Several views and reports are available to assist you during the migration process. View PermissionsViewing permissions enables you see an item’s users and groups (on the top pane) and the security permissions assigned to each user/group (on the bottom pane). To view permissions:
The View Permissions window is displayed.
Figure 35: View Permissions Window
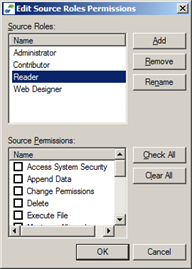
Edit RolesEditing roles allows you to add, remove, or edit roles and assign specific permissions to each role. Roles are used during the migration of security settings. To edit roles:
The Edit Roles window is displayed.
Figure 36: Edit Source Roles Permissions window
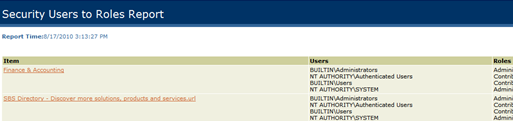
View Users RolesView User Roles displays users roles report for each item, the security entities that have permissions on the item and their matching role. To view the Users Roles report:
The Users Roles report is displayed.
Figure 37: Users to Roles Report
View Users PermissionsView Users Permissions displays users permissions report, for each item, the security entities and their permissions. To view the Users Permissions report:
The Users Permissions report is displayed. Figure 38: Users to Permissions Report Import/Export Role DefinitionsSince roles can be modified, it is often useful to have the ability to export and import the roles definitions to a file. The roles can then be imported for use in a different project. To Import/Export role definitions:
The Import/Export Role Definitions window is displayed.
Figure 39: Import/Export Role Definitions Window
Modeling SharePoint Security and PermissionsSharePoint 2007, SharePoint 2010, SharePoint 2013 and Office 365 SecurityEach site collection in SharePoint 2007, SharePoint 2010, SharePoint 2013 and Office 365 has its own list of users and groups. Once you grant certain user permissions on content or sub content of the site collection, the user is added to the site user list. Also, new groups that are created are added as site collection groups. In SharePoint 2007, SharePoint 2010, SharePoint 2013 and Office 365 content can be secured at all hierarchy levels: site, list, library, folder, or item. Each user is granted permission for the specific content, either directly or by being a member of a site group which has permissions for that content. Once you create sub content, the default security settings to this sub-content are inherited from the parent content. Using the SharePoint user interface, you can change these default settings and assign unique permissions to the sub-content. SharePoint 2007, SharePoint 2010, SharePoint 2013 and Office 365 have used the concept of permission-levels, which are permission sets. Each user or group can be assigned with one or more permission-levels. Permission-levels are managed in sites and can be inherited from a parent site. SharePoint 2003 SecurityIn SharePoint 2003, site group is used as a role. This means that if you wish to grant a user certain permissions, you add that user as a member of a site group that has those permissions. Each site that breaks inheritance has its own set of groups. In SharePoint 2003, content can be secured only at the site, list, or library level. A user could be granted site permissions only by being a member of one of the site groups. Also, a user can get explicit permissions on a list or library.
Tzunami Deployer enables you to perform the following security and permissions customizations:
Creating GroupsIn order to assign permissions to an Active Directory user or group, you must first add the user or group to the site, either directly or as part of a SharePoint group.
To create a group: 1. Right-click a SharePoint site and select Security > Edit Users & Groups. The Manage Security window appears, listing all SharePoint groups (
Figure 40: Manage Security Window 2. Click Create and select Group.
The Create Group window appears.
Figure 41: Create Group Window
3. Enter a name and description for the group and select a user to be the group owner. 4. Add members to your group and click OK.
The new group is added to the Manage Security window.
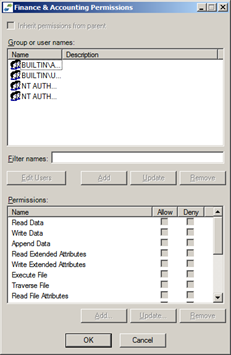
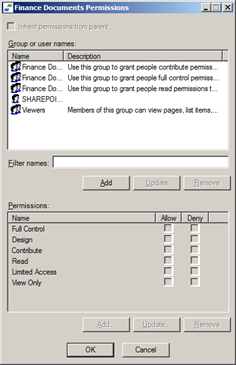
Assigning Permissions to Users and GroupsIn order to assign user permissions, you must add users to a group or Cross-site group. To assign user and group permissions: 1. Right-click a SharePoint item and select Security > Edit Permissions. The <Item Name> Permissions window appears.
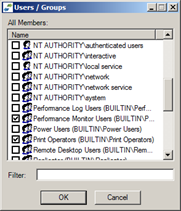
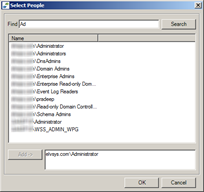
Figure 42: <Item Name> Permissions Window 2. Click Add. The Users / Groups window appears displaying all the available users and groups.
Figure 43: Add User Window
3. Select the relevant users and/or groups and click OK. The selected users/groups appear in the <Item Name> Permissions window (Figure 42). 4. Select a user/group and assign the various permission / permission-levels in the Permissions area. 5. Click OK. The user/group permissions are assigned.
Modifying GroupsTo modify a group:
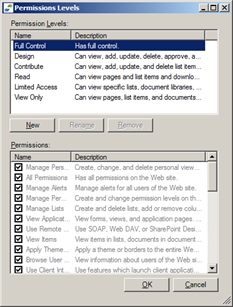
Modifying Permission LevelsThis option is available only for MOSS/WSS3.0, SPS2010/SPF2010, SPS2013/SPF2013 and Office 365. You can modify any of the permission levels, except for Full Control and Limited Access. The permissions are inter-dependent. Selecting certain permissions might select other permissions that are required in permission levels. To modify a permission level: 1. Right-click a SharePoint site and select Security > Edit Permission Levels. The Permissions Levels window appears.
Figure 44: Permissions Levels Window 2. Select a permission level and select which permissions to assign to the permission level. 3. Click OK.
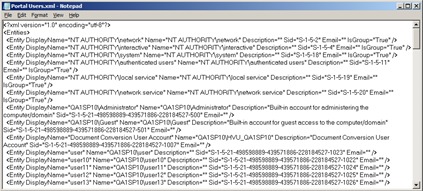
Importing and Exporting UsersTzunami Deployer enables you to export or import Active Directory users and groups to an XML file. For organizations with a large Active Directory, you can connect and read the entire Active Directory domain users and groups once and then export it. Future projects can then import the XML file instead of rereading the Active Directory domain.
To export users:
Figure 45: Import/Export Users Window
2. Select Export users to XML file and click Browse… 3. In the File Name list, type or select a name for the file. 4. Click Export. The users are exported to the XML file.
To import users:
The users will be available in Deployer project target as normal AD users.
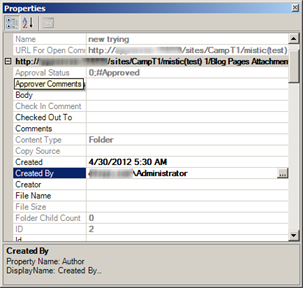
Find and View ItemsViewing Item PropertiesYou can view the metadata properties or other attributes of various objects in Tzunami Deployer. The Properties window displays the properties of the currently selected item. If more than one item is selected, a property whose value is not the same for all items appears empty. Editing such a property affects all the selected items. Read-only properties are grayed out in the Properties window. The Properties window can remain open while you work in the Project window. To view an object’s properties:
Or Click . Or Press F4. The Properties window appears. Figure 46: Properties Window
To modify user type properties
Finding Item VersionsYou can view the versions of various items in Tzunami Deployer. The Versions window displays the properties of each version of the item. To view an item’s versions:
The Versions window appears. Figure 47: Versions Window
Finding ItemsYou can find one or more items in a project. The Find window enables you to find items based on different criteria and properties. To find items:
The Find window appears. Figure 48: Find Window
Table 8: Find window Fields
Deploying Source Data for MigrationThe deployment stage specifies which source folders, files, and items are to be migrated to which SharePoint site collections, sites, lists, and folders on the target SharePoint server. Similar to the modeling stage, Tzunami Deployer does not immediately migrate the source items to the SharePoint server during deployment, but only stores the migration instructions in the current Tzunami Deployer project. The Tzunami Deployer content migration changes are only applied to the target SharePoint server in the committing stage. For more information about committing, see Committing the Migration on page 4-84. In the modeling stage, you can define the SharePoint structure into which you can deploy the source folders and files. If you wish, you can design and define the entire model of the SharePoint structure and only then deploy your first folders and files. Alternatively, you can iteratively design parts of the SharePoint structure, deploy the items into those parts and then go back and repeat this process as many times as required. In some cases, not all source items are to be migrated. For example, executable files such as EXE and DLL are usually not stored in SharePoint. In other cases, the target location for items is determined by their metadata properties. For example, you may want items created in the year 2001 to be placed in a corresponding folder in SharePoint. In both cases, you can filter the source so that only relevant items will be affected by the current deployment operation. For more information, see Filtering Source Itemson page 4-81. After completing the deployment stage, the target items appear with an upload overlay ( ). To remove the item assignment, find the location in which the item is deployed (in the target SharePoint) and delete it. For information about finding deployment locations, see Managing the Deployment Processon page 4-80. The following steps describe how to deploy source items to a target SharePoint:
Deploying Selected Source Items to a Target SharePoint LocationsWhen you select to deploy a source item to a target SharePoint item, some items may not be deployed for the following reasons:
To select the source items and target locations:
Or Right-click the selected items in the source store and select Deploy to. The Target items window appears displaying the target SharePoint store.
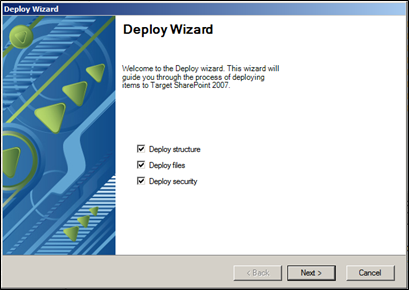
3. Select the target location and click OK. The Deploy Wizard appears (Figure 49).
Defining Deployment OptionsAfter selecting the source items and target location for deployment, the next step is to define the behavior of the deployment. This is done using the Deploy wizard, which guides you through the following:
Figure 49: Deploy Wizard
To define the deployment behavior: 1. Select one or more of the following deployment options:
2. Click Next. The Deploy wizard displays the Global Settings screen (Figure 50).
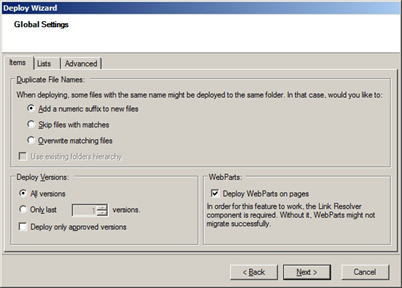
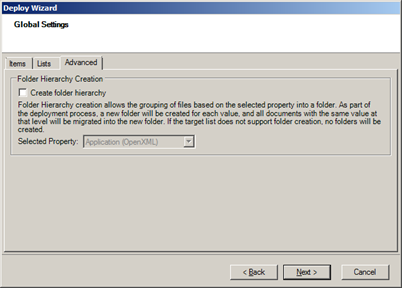
Defining Global SettingsYou can define the global setting of items, lists and advanced folder hierarchy in the Global Setting Screen. Figure 50: Deploy Wizard - Global Settings Items
This screen adds a numeric suffix to new item, skips item with matches or overwrite matching items when deploying some files with the same name that might be deployed to the same folder.
To define the Global Setting Items: 3. Select the various global setting items from Items Tab and according to the information in the following table.
Table 9: Deploy Wizard –Global Settings Items
Figure 51: Deploy Wizard - Global Setting Lists
To define the Global Setting Lists: 4. Select the various global setting lists from Lists Tab and according to the information in the following table. Table 10: Deploy Wizard - Global Setting Lists
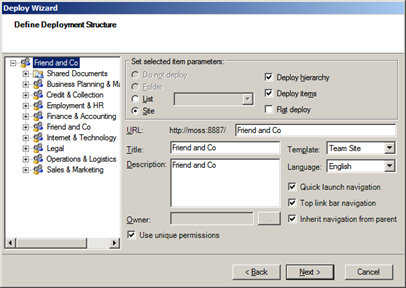
Figure 52: Deploy Wizard - Global Setting Lists This screen enables you to create folder hierarchy by grouping the files based on the selected property into a folder. For e.g. if an organizations have documents in a folder are separated by the ‘Document Type’ property according to the departments (Marketing, Sales, HR, Account, Finance, etc.). When deploying, a new folder will be created for each ‘Document Type’ property and all documents the same property at that level will be migration into the new folders (Marketing, Sales, HR, Account, Finance etc.). To define the Advance Global Settings 5. Select Folder Hierarchy Creation to select property of folder. 6. Select Folder Property and Click Next. The Deploy wizard displays the Define deployment structure screen (Figure 53). Defining the Deployment StructureYou can define the deployment behavior of folders and container hierarchies in the Define deployment structure screen. The options in this screen differ according to the type of SharePoint target location into which you are deploying. In addition, the type of item you select in the tree determines the options in the Set selected item parameters area. For example:
The configuration that you set for any item overrides the configuration of its sub‑items. For e.g. when deploying into a site, if you deploy a folder as a library, you can deploy its sub‑folders only as sub-folders of the library, and not as sub-sites. Figure 53: Define Deployment Structure Screen
This screen enables you to specify which type of items will be created in SharePoint and to set various deployment parameters. You can select and configure each branch of the deployment structure tree. For e.g. you can specify that a folder from the source file system is deployed as a new site, and that its sub-folders are deployed either as sub‑sites of the new site, as lists of that site, or as sub folders of the new site’s default document library. To define the deployment structure:
Table 11: Deploy Wizard – Items Handling Window Fields
2. Click Next. If Security is deployed, the Deploy wizard displays the Map source users and groups screen (Figure 59). If Security is not deployed, the Deploy wizard displays the Property Mapping screen (Figure 54). For more information, see Mapping Properties on page 4-67.
Mapping PropertiesItems are associated with metadata properties (sometimes referred to as fields or attributes), such as creation date, last modification date, author, title, keywords, status, and so on. When the source property set (sometimes referred to as category or profile) does not match the target SharePoint property set (the columns in the target list or folder), Tzunami Deployer requests information regarding the mapping of source properties to target properties. The Property Mapping screen appears, as shown below. Properties with the same name and matching types are automatically matched and appear in the Mapped Properties area, as well as previously mapped properties. Tzunami Deployer has an ability to add Content Types (that already exists on the Target Site Collection) to the lists/libraries during deployment. For more information, see Adding Content Type on page 4-69. If any source properties cannot be matched to any target property, a yellow notification bar at the top of the screen indicates that the target has fewer properties than the source. This may indicate that you might lose data, since source information is not deployed to target SharePoint columns. You can click the link in the notification bar to automatically add properties to your target SharePoint list. For more information, see Automatically Adding Propertieson page 4-71. Alternatively, you can manually add the missing columns before starting the deployment process. For more information, see Modeling SharePoint Metadata Service on page 4-41. Figure 54: Property Mapping Screen
To map properties: 1. Click Add Content Type and select the Content Type from the list. Repeat this step for each property you wish to add Content Type. 2. Select a source property and its corresponding target property and click Map. Repeat this step for each property you wish to map. The mapping is displayed in the bottom of the screen.
3. Click Next. The Deploy wizard displays the Value Mapping screen (Figure 57).
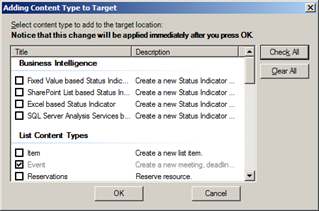
Adding Content TypeTzunami Deployer enables you to add Content Type to target during deployment. The Adding Content Type to Target window shows the list of Content Type from the Target Site collection, which allows you to select one or more Content Type from the lists that you want to add in lists\libraries during deployment. The added Content Types that you selected in this window will be available in the Content Type Value Mapping screen. Figure 55: Adding Content Type To Target Window
To add content type
Table 12: Adding Content Type to Target Window Fields
2. Click OK. The added content type properties are displayed in the Property Mapping Screen (Figure 54).
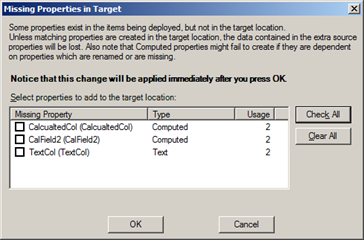
Automatically Adding PropertiesTzunami Deployer enables you to automatically create the missing columns in your target SharePoint list if it has fewer properties than your source. The Missing Properties in Target window lists the properties that were not mapped and offers to create respective columns in the target. All the source properties that you select in this window are automatically mapped to their corresponding newly created SharePoint columns. Figure 56: Missing Properties in Target Window
To automatically create and map properties:
Table 13: Missing Properties in Target Window Fields
2. Click OK. The added target properties are automatically mapped with the respective source properties and are displayed in the Property Mapping screen (Figure 54).
Mapping Property ValuesIn order to assign values to choice properties (properties that offer a list of specific possible values, For e.g. Status) and user properties (such as Created By and Modified By), Tzunami Deployer enables you to map values from the source items to specific target choice values. After you map properties, as described in the previous section, the Value Mapping screen appears, once for users and once for each choice (and multi-choice) property in the target locations. Figure 57: Value Mapping Screen
This screen displays the source property and valid target property values, as well as any existing mappings.
To map source property values to target property values: 1. Select a source property value and a corresponding target property value and click Map. Repeat this step for all the property values you wish to map. The mapping is displayed in the bottom of the screen.
2. Click Next. This Value Mapping screen will reappear for each mapped target choice (and multi-choice) property, as well as once for User type properties. When all source property values are mapped, the Deploy wizard displays the Ready to deploy screen.
Completing the Deployment ProcessTzunami Deployer is now ready to deploy the source items into the target SharePoint. Figure 58: Ready To Deploy Screen
If Tzunami Deployer encounters errors or deployment failures, these errors are displayed in the deployment report and are announced in the next step of the wizard. To complete the deployment process: 1. Click Next. Tzunami Deployer begins deploying your source items into your target SharePoint. When the structure is created and the documents are added, the Ready to deploy screen displays a link to view the deployment report. If any warnings or errors were generated as part of the deployment process, icons with the relevant number of errors/warnings appear.
2. Click Next. The Deploy wizard displays the Deploy security screen. 3. Click Next. The security deployment process begins.
When Tzunami Deployer finishes deploying all items and settings, the Deploy wizard displays the Thank you screen. 4. Click Done. The new items are displayed in the bottom half of the Project window.
Mapping Security InformationThe first page of the Deploy Wizard contains the Deploy Security checkbox. Selecting this checkbox enables you to also deploy the source security settings for your deployed containers and items. If you select the Deploy Security checkbox, the following screens are added to the wizard:
In the following example we review a deployment from LiveLink to MOSS. Assuming we would like to deploy the following hierarchy as a Document Library into MOSS:
Tzunami Deployer uses the concept of security roles, each representing a set of permissions. If the source system supports this concept, the roles are read from the system. Otherwise, Tzunami Deployer generates its own roles. You can add, remove and modify the roles used. David’s set of permissions qualify him the role of Contributor on the Documents folder and its content, but qualifies as an Administrator on Sub Folder and its child item. Ron’s role is Web Designer on all the hierarchy and Test Group has the role of Reader on all content except for Documents, in which he is a Contributor.
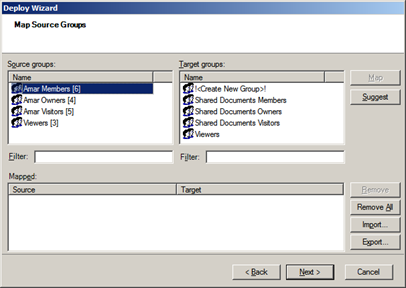
Groups Mapping Figure 59: Group Mapping screen
The screen consists of three lists:
In this step you can map a source group either to an existing site group, or to create a new site group bearing the same name. In our example, we have only one source group (Test Group), and in the target we have the three default site groups (Members, Owners, and Visitors) and one user-created group named Target Group. We will map Test Group to Target Group. This means the members of Test Group will be added as members of the Target Group.
Entities Mapping Figure 60: Entities Mapping screen
This screen also consists of three lists:
In this step you can map each source user or group to a target user or group. Mapping a source entity to a target entity means that the target entity will receive the same permissions that the source entity has. These permissions will be assigned based on the role mapping step (see Role Mapping on page 4-77). Also, when Tzunami Deployer performs the group mapping, group membership is migrated based on the entities mapping.
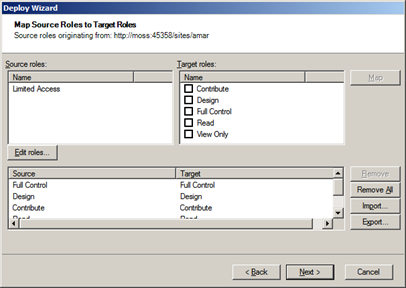
Role MappingAfter mapping the default user and the other users you wished to map, click Next to get to the third security screen: Role Mapping: Figure 61: Role Mapping screen
This screen contains three lists:
Roles, as mentioned earlier, are sets of permissions. In this step you map a source role to a target role. This means that target entities that were mapped to a source entity with a certain role will be assigned with the corresponding role that will be mapped in this screen. A sensible mapping would be: Administrator > Full Control, Contributor > Contribute, Reader > Read, Web Designer > Design.
Following our example, the outcome of our security mapping will be:
Checking Deployed ItemsOnce you have finished the deployment, you can scan the hierarchy of items and search for problematic items. To find problematic items:
Tzunami Deployer scans the hierarchy in the target system for problematic items. If there are no problematic items, a message is shown. If Tzunami Deployer encounters problematic items, the Problematic Items window appears (Figure 62).
The following problems are checked:
Figure 62: Problematic items window
Managing the Deployment ProcessThis section describes a variety of options that enable you to keep track of the deployment process. For e.g., you can determine which source items are deployed to which target locations:
The first number is the number of files and items deployed, but not yet committed to the target SharePoint. The second number is the total number of files and items in that particular location and all its nested hierarchy. In the source system, this enables you to verify that all files intended for migration were indeed deployed. In the target SharePoint system, this indicates how many items currently in the specific location were deployed but were not yet committed to SharePoint.
If you try to redeploy an item that is already deployed, a message is displayed. You can remove a deployed item by finding the location to which the item is deployed (in the target SharePoint) and delete it.
Filtering Source ItemsWhen you apply a filter to a folder, the filter is automatically applied to all sub-folders. You can set a different filter for a sub-folder or disable filtering for it altogether by editing the sub-folder’s filter settings. To filter the source store list:
Or Right-click a source folder you wish to filter and select Filter. The Edit Filter window appears. Figure 63: Edit Filter Window
2. Select a property from the list of Properties. 3. In the Condition area, select one of the following conditions from the drop-down list and enter a value in the corresponding field(s):
4. Click Add Condition. The condition is added to the Filter area, displaying the full filter expression.
5. Click Import/Export Button. Export button can be pressed to dump added filter condition as an XML file. Likewise, Import button can be pressed to import the saved filter conditions accordingly. 6. Click OK. The filter is applied to the source hierarchy and the icon at the filtered location, including all its sub-folders, includes a filter overlay ( ), as well as an additional counter specifying the number of files and items that passed the filtering.
Best Practice for deploying source
Make sure not to deploy the same site collection using two different projects that are destined to run simultaneously, as this could cause inconsistency issues.
Committing the MigrationThe committing stage executes your target SharePoint customizations and migrates your source items to your target SharePoint. You can perform the committing stage immediately after deployment or you can schedule it for a later date. For more information, see Schedule Commit on page 4-86 and Batch Mode Commit on page 4-88. The committing process first applies the model that was designed in Modeling SharePoint Targets on page 4-35. This ensures that the sites, libraries, lists, and folders are created in the target SharePoint and that their metadata is set, so that they are ready for the migration of items into them, according to the deployment scheme you built in Deploying Source Data for Migration on page 4-59. The actual content migration physically copies the source items (For e.g. Microsoft Office documents) to the target library, list, or folder on the SharePoint site, while updating their metadata properties according to the Tzunami Deployer project definitions. You can estimate how much time the committing stage requires with the following calculation: ( X x Y ) ( N x Z ) = anticipated committing time.
Where: X – The total number of documents to commit. Y – The average committing rate for one Tzunami Deployer instance. This rate can be determined by committing a project and dividing the number of documents by the amount of hours taken to complete committing. Z – The number of servers (that meet the required specifications) available on which to run Tzunami Deployer. N – The number of Tzunami Deployer instances planned to run on each server.
After the committing stage is complete, the numbers on the left of the item counters in both the source and target trees are set to zero and the New, Modified, and Deployed overlays are removed from all icons.
Committing NowTo commit the changes to the SharePoint server:
Or Click Or Right-click in the target SharePoint store area and select Commit to SharePoint.
Tzunami Deployer prompts you to verify that you wish to commit your changes to SharePoint.
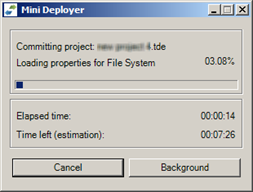
2. Click Yes. Tzunami Deployer begins committing your changes and displays a progress window indicating the number of modifications being made to the SharePoint server, as well as the progress and time estimation.
Figure 64: Commit Progress Window
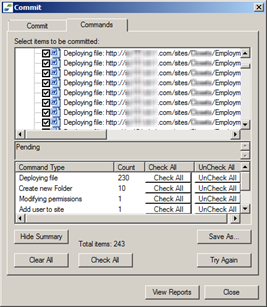
If the committing process completes successfully without errors, you have finished migrating your content. If errors or failures are displayed in the Commit Progress window (Figure 64), a new tab is added to the window, indicating which items were not committed and what problems caused the failure.
3. Click the Commands tab. The Commands tab appears listing the actions that failed to be committed to SharePoint and the reason for the failure. All actions are selected by default. Figure 65: Commit Window – Commands Tab 4. Select the actions that you want to retry committing to SharePoint and click Try Again.
Schedule CommitYou can schedule Tzunami Deployer to commit a project at a time that is most convenient for you. To schedule Deployer project:
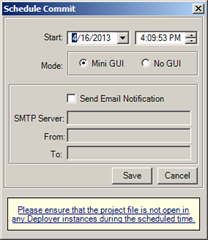
Or Click Or Right-click in the target SharePoint store area and select Schedule Commit to SharePoint 2013/SP Remote/Office 365.Check this The Schedule Commit window appears. Figure 66: Schedule Commit window Table 14: Schedule Commit
2. Click Save.
Batch Mode CommitWith Task Scheduler, you can schedule Tzunami Deployer to commit a project at a time that is most convenient for you. To set a time for committing a project:
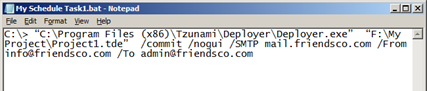
Deployer.exe <DeployerProjectFile> [/commit [/nogui] [/minigui]] [/SMTP <mail.domain.com>] [/From <name@domain.com>][/To <name@domain.com>] Usage
For example: C:\> “C:\Program Files (x86)\Tzunami\Deployer\Deployer.exe” “F:\My Project\Project1.tde” /commit
C:\Program Files (x86)\Tzunami\Deployer> Deployer.exe “F:\My Project\Project1.tde” /commit /nogui
C:\Program Files (x86)\Tzunami\Deployer> Deployer.exe “F:\My Project\Project1.tde” /commit /minigui
C:\> “C:\Program Files (x86)\Tzunami\Deployer\Deployer.exe” “F:\My Project\Project1.tde” /commit /nogui /SMTP mail.friendsco.com /From info@friendsco.com /Toadmin@friendsco.com
The first parameter is the path to Deployer executable file.
Save the file.
2. Run the batch file in the task scheduler. For more information about task scheduler, refer to: http://technet.microsoft.com/en-us/library/cc748993.aspx.
Best Practice for Committing a Deployer Project
Rough time estimation for the duration of the commit process can be calculating using these parameters: ( X x Y ) ( N x Z )
Test |


 ) appears under the folder in the deployment structure tree and all sub-folders are hidden.


 Find Source/Target to find the deployed source item.